CAPTCHA with OpenLiteSpeed
OpenLiteSpeed features CAPTCHA as a method of defense against DDoS attack.
When a visitor accesses the website, they will need to go though CAPTCHA validation. After passing the CAPTCHA validation, the visitor is temporarily allowlisted as long as they continue to browse the site. Once the visitor has become inactive, CAPTCHA is once again enabled for that visitor's next request.
If the user fails to pass CAPTCHA validation a few times, the server will return a 403 error and then drop the connection from that IP.
Enable CAPTCHA at the Server Level
In the OpenLiteSpeed WebAdmin Console, navigate to Server Configuration > Security > CAPTCHA Protection. Configure the following settings:
- Enable CAPTCHA: The master switch. This should be set to
Yes. If you wish to use CAPTCHA at the virtual host level, then you must first enable it here, at the server level. CAPTCHA will be activated when the number of concurrent requests reaches the configured Connection Limit. - CAPTCHA Type: The CAPTCHA type to use with the key pairs. If a key pair has not been provided and this setting is set to
Not Set, a default key pair of typereCAPTCHA Invisiblewill be used.reCAPTCHA Checkboxwill display a check box CAPTCHA for the visitor to validate.reCAPTCHA Invisiblewill attempt to validate the CAPTCHA automatically, and if successful, will redirect to the desired page.hCaptchais used to support CAPTCHA provider hCaptcha.reCAPTCHA Invisibleis the default, but for easy testing, you can switch toreCAPTCHA Checkbox. If you have trouble with thereCAPTCHA InvisibleCAPTCHA continuing to auto-refresh and then fail, change the type toreCAPTCHA Checkbox. All types require Site Key and Secret Key to be configured. - Max Tries: The maximum number of CAPTCHA attempts permitted before denying the visitor. Default value is
3. - Connection Limit: The number of concurrent connections (SSL & non-SSL) needed to activate CAPTCHA. CAPTCHA will be used until concurrent connections drop below this number. Initially you should set this number low enough for easy testing. For example,
2. The default value is15000, which makes it almost impossible to activate the CAPTCHA. - SSL Connection Limit: The number of concurrent SSL connections needed to activate CAPTCHA. CAPTCHA will be used until concurrent connections drop below this number. Initially you should set this number low enough for easy testing. For example,
2. The default value is10000, which makes it almost impossible to activate the CAPTCHA.
Enable CAPTCHA at the Virtual Host Level
Server-level CAPTCHA must be enabled first, as it is the master switch. Then you can change virtual-host-level connection limits, which will override server level limits.
To change CAPTCHA settings for the Example virtual host, navigate to Configuration > Virtual Hosts > Example > Security > LS CAPTCHA and set Enable CAPTCHA to Yes. Update the other settings as desired.
Customizing the Good Bots List
Google bots are considered good bots because they help index your site. However, they cannot do their job properly without receiving the correct page. The Bot White List configuration may be used to specify bots that you may need for your site. 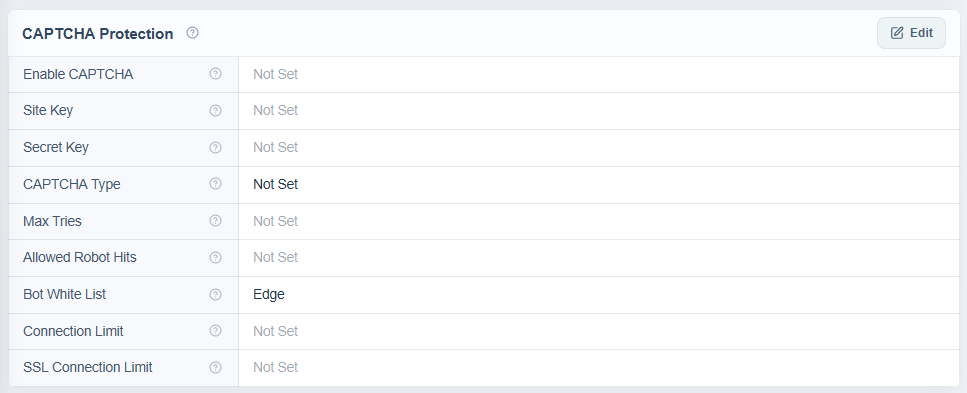 Here, we have configured
 Edge in the Bot White List text area. Bot White List is a "contains" match, but regex may be used as well.
After restarting, browsers containing Edge in the user-agent header will bypass CAPTCHA:  In the image above, the browser on the left is Microsoft Edge, the browser on the right is Google Chrome.
The Allowed Robot Hits configuration may be used to limit how many times a good bot (including Googlebot) is allowed to hit a URL before it is redirected to CAPTCHA as well. This may be useful to prevent bad actors from bypassing CAPTCHA using a custom user agent.
Customizing the CAPTCHA Page
The default CAPTCHA page is generic. If you would like to customize the page, you may do so by creating a file at $SERVER_ROOT/lsCAPTCHA/_CAPTCHA_custom.shtml
There are two script tags that are required and it is strongly recommended to avoid changing the form and the CAPTCHAdiv unless you know what you are doing. There are three echos within the page itself. Those are used by the web server to customize the CAPTCHA type and keys and specify any query string used.
Beyond those required attributes, everything else is customizable. As noted before, please ensure that you have backups of the default page and your customized page. Note that the .shtml extension is required in order to use configured type and keys.
Apply Your Own Site Key
You can apply your own CAPTCHA key and adjust the configuration as you like. Client verification is completely determined by Google's CAPTCHA or the hCaptcha service, depending on which you are using. The invisible type may display a difficult puzzle.
For server wide protection that needs to cover a lot of domains, make sure Verify the origin of CAPTCHA solutions is unchecked. Otherwise, you may need to apply a key for each domain.
CAPTCHA Returning 403 and Dropping Connection
If CAPTCHA fails a few times, it will return a 403 error and then drop the connection from that IP. It is the way it works in order to block attacks. If the reCAPTCHA Invisible CAPTCHA keeps auto-refreshing and then fails, just change the type to reCAPTCHA Checkbox
Blocked IP Addresses
If a visitor is not given the full number of Max Tries before being blocked, check the blocklist. If the visitor's IP is not explicitly blocklisted, it may be temporarily blocked due to previously failed CAPTCHA attempts. Clearing the RAM will remove the IP from the temporarily blocked list.
If you are a Cloudflare user, you might have to whitelist the Cloudflare IPs with Trusted status in order to prevent CAPTCHA challenges being presented to all visits proxied through Cloudflare.